
Tokens
Agent tokens for AI assistants and API tokens for programs: create, connect, edit, regenerate, and revoke them.
What are tokens?
A token is a credential that lets something outside Indicate authenticate against your space. Indicate has two kinds, and they sit on two tabs of the same page under Settings → Tokens:
Agent tokens connect an AI assistant to your space, so you can ask questions about your metrics and data in plain language. Claude Desktop, Claude Code, the Indicate extension for VS Code, n8n, Langdock, or any other client that speaks MCP. The assistant sees the Insights of the space, the same governed metrics your widgets use. It does not see raw tables. Each agent token is billed as an extra seat, see the pricing page.
API tokens give a program access to the Indicate API, for example an internal product or a customer-facing application that reads your metrics. API tokens are part of the Pro plan.
If a tool acts on someone's behalf and asks questions, you want an agent token. If a piece of software reads Indicate as a data source, you want an API token.
Note: For AI assistants that sign in with OAuth, such as Claude AI or ChatGPT connectors, there is a third way that needs no token at all: Apps. Every user authorizes with their own account and is billed as a seat. See Apps.
Where do I find tokens?
Click the gear icon at the bottom of the left rail to open Settings.
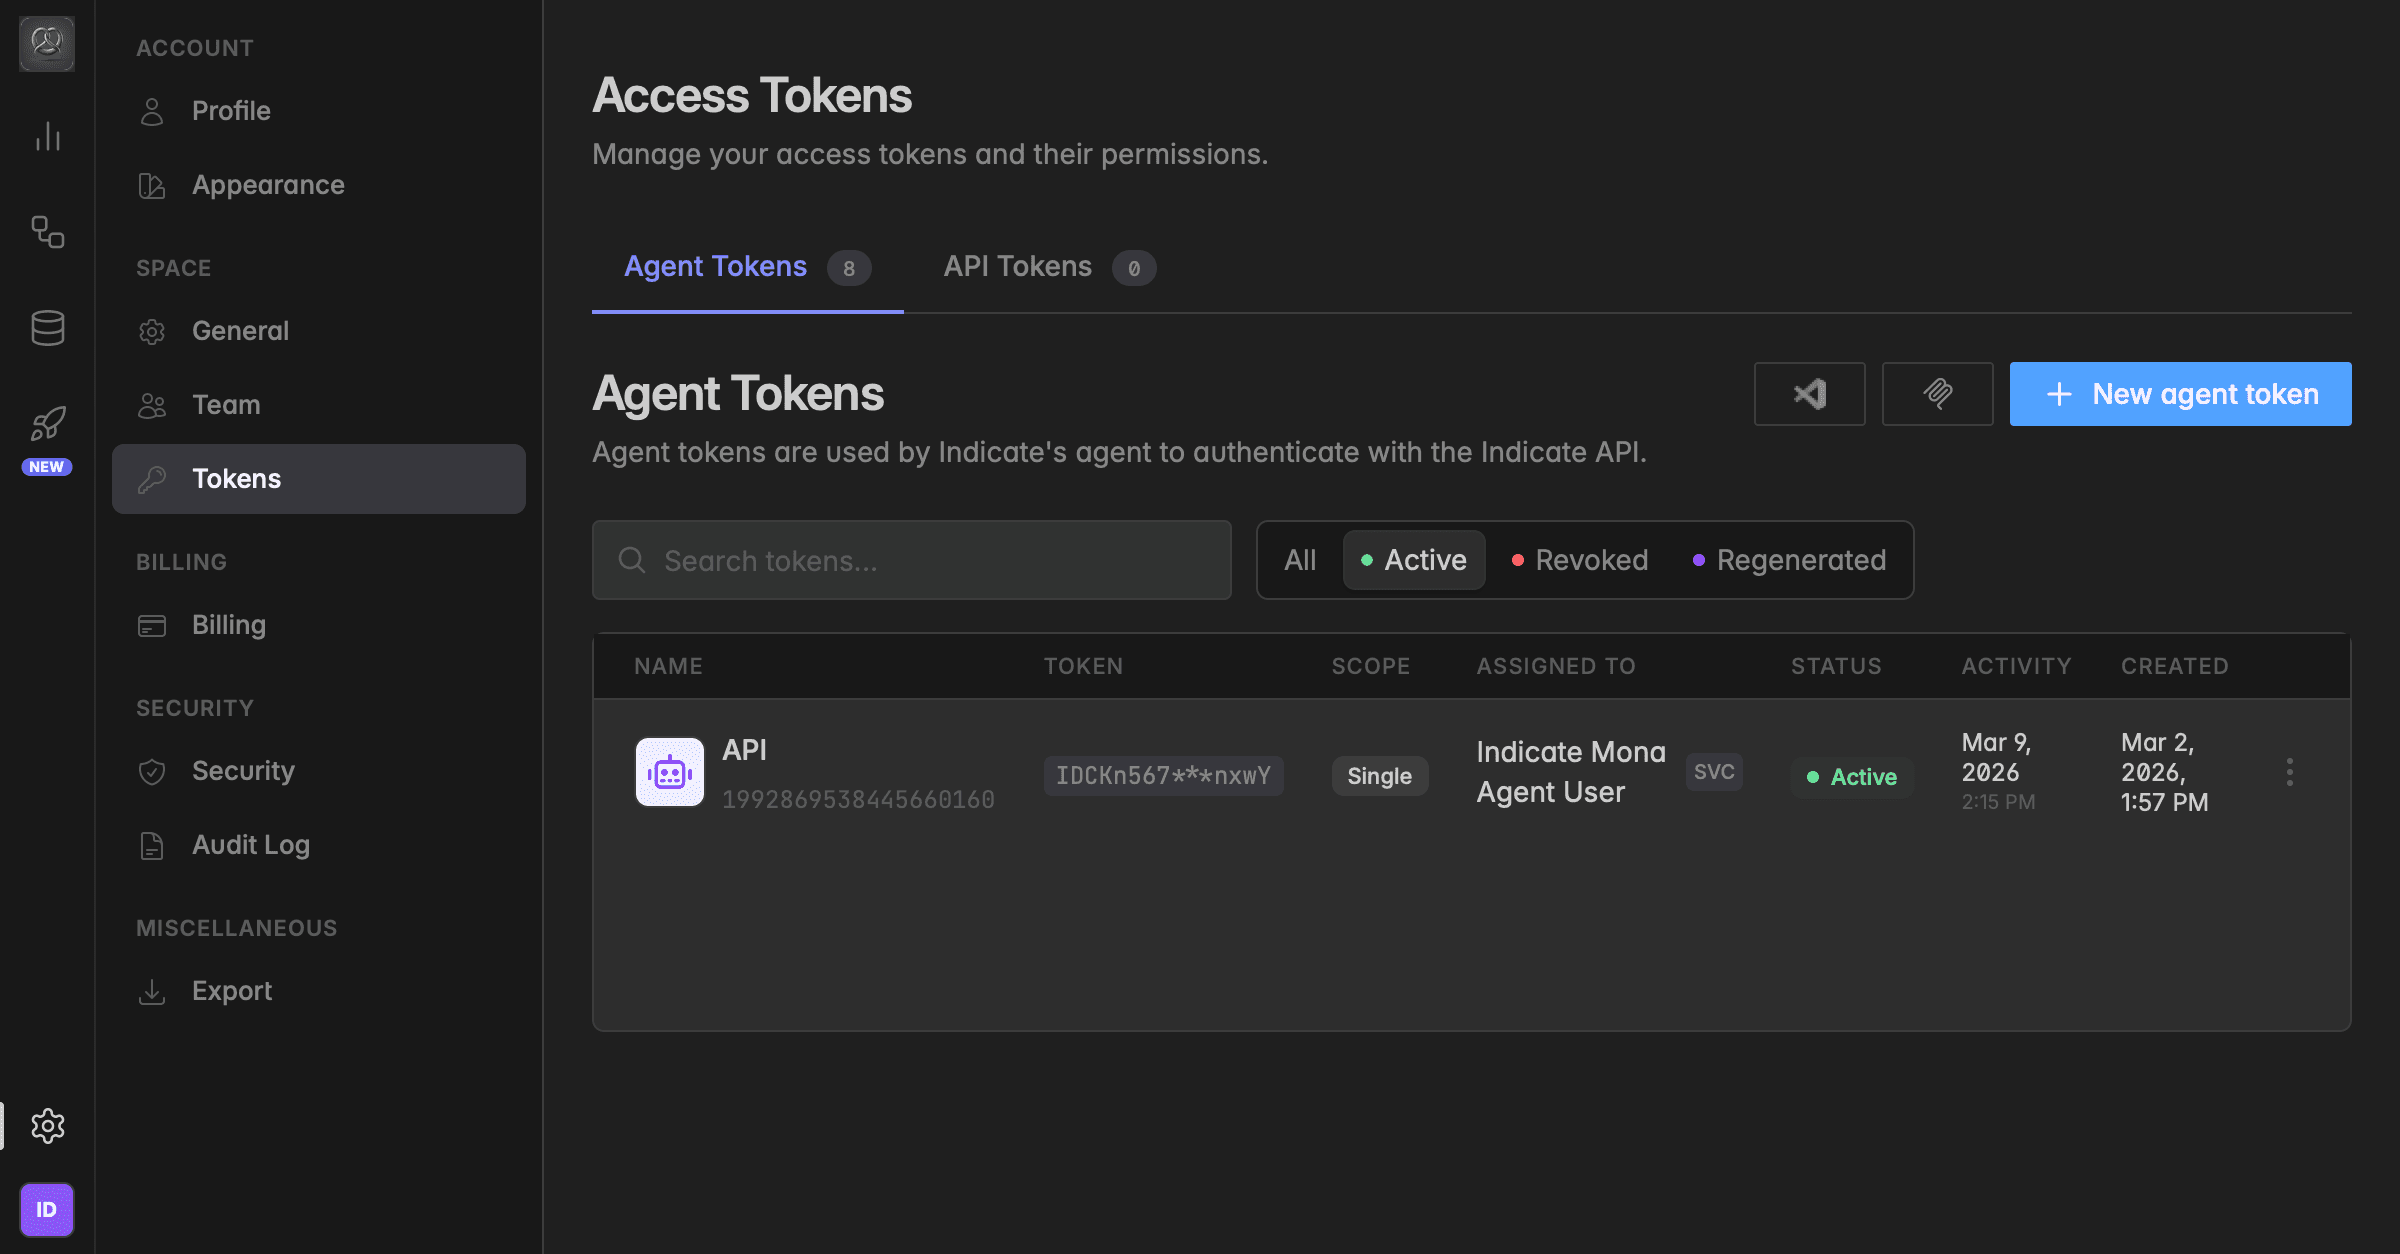
Under Space, click Tokens. The tab Agent tokens is open by default, the tab API tokens sits next to it. Each tab shows how many tokens it holds.
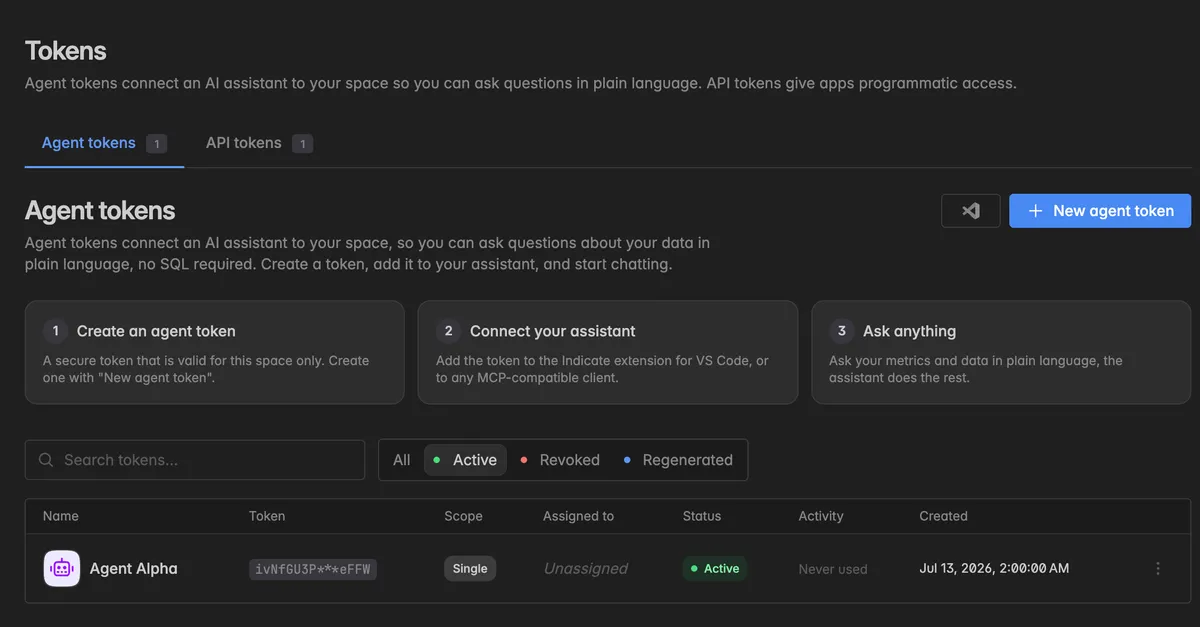
The Agent tokens tab walks through the three steps: create a token, connect your assistant, ask anything. Below the list, Connect your AI assistant shows the setup for VS Code, Claude Desktop, and Claude Code.
How do tokens relate to accounts?
A token is assigned to one account, either a member or a service account, and inherits every permission that account has in the space.
One account can have many tokens. One token belongs to at most one account.
A token without an assigned account has no permissions and cannot read any data. You can assign an account when you create the token or later with Edit.
Revoking a token does not touch the account. Deleting the account revokes all of its tokens.
For integrations that should keep working when people leave, assign the token to a service account. See Service accounts.
Single space or multi-space?
Every token has an access scope, chosen when you create it:
Single space: the token works in the space where you created it.
Multi-space: the token works in every space the assigned account belongs to.
The scope cannot be changed later. To switch, revoke the token and create a new one. For agent tokens the scope also decides the seat billing, see the pricing page. For API tokens, multi-space is locked when your plan does not include it.
How do I create an agent token?
Only Admins and the Owner can create tokens. Decide first which account the token should inherit its permissions from, and whether it needs one space or all of them.
On the Agent tokens tab, click New agent token.
Enter a Token name that says what the token is for, for example
Marketing Claudeorn8n reporting.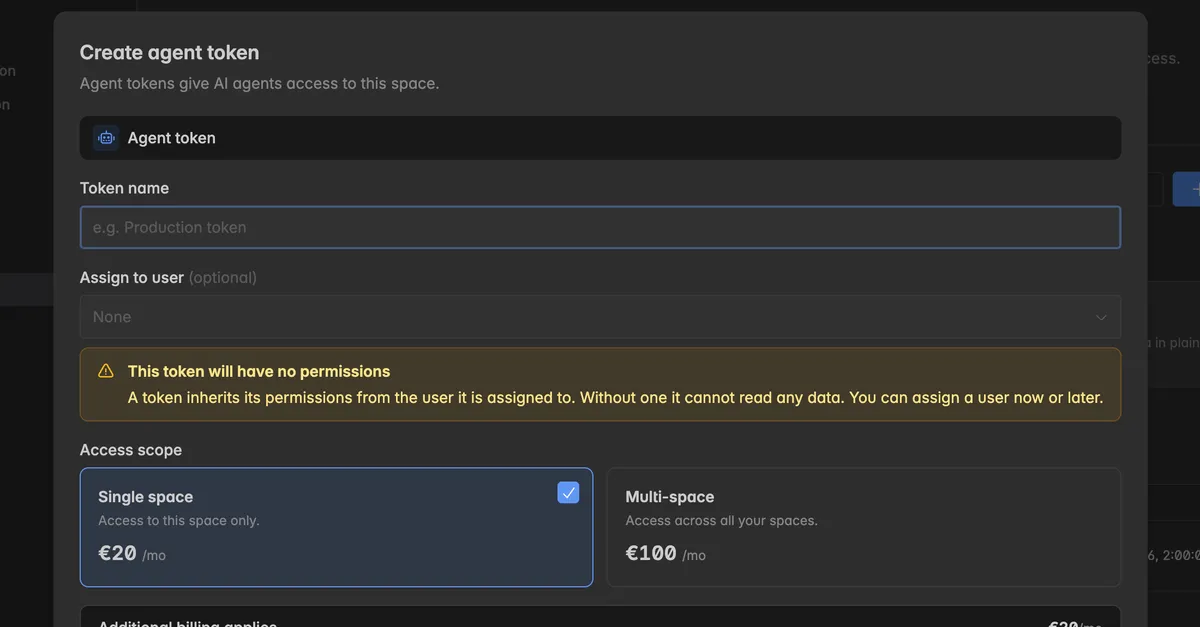
Under Assign to user, pick the member or service account the token belongs to. The dialog confirms which permissions the token inherits. Leave it at None and the dialog warns This token will have no permissions until you assign one later.
Pick the Access scope: Single space or Multi-space.
Read Additional billing applies and switch on I agree to the additional billing. The switch is required.
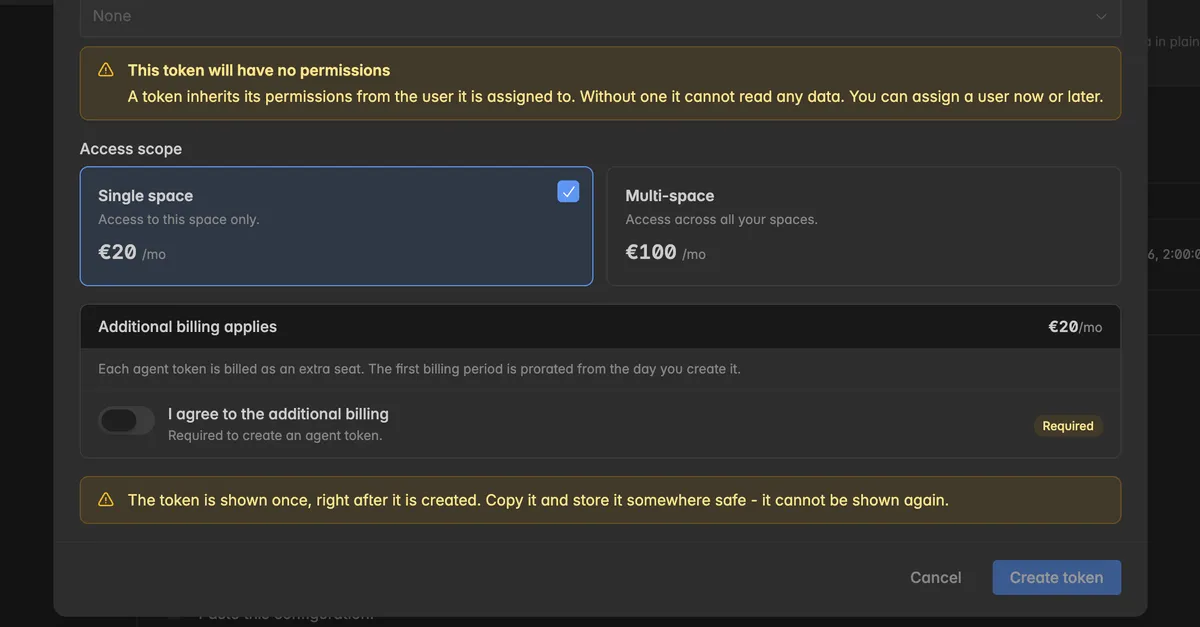
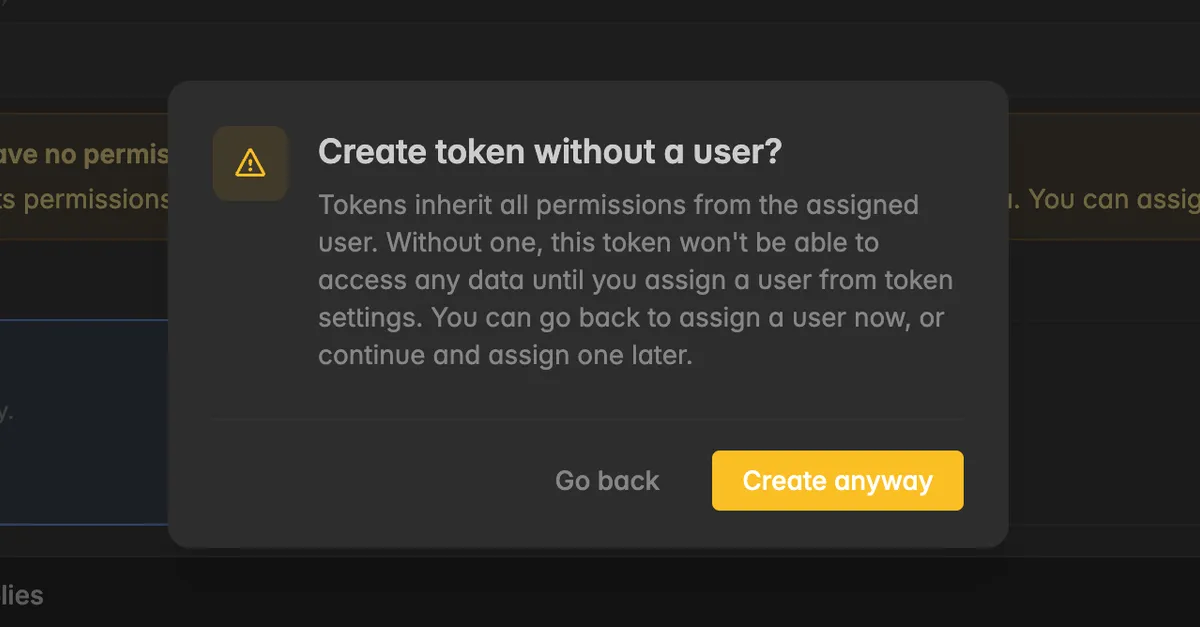
Click Create token. If you left the account at None, the dialog Create token without a user? asks once more. Click Go back to assign one, or Create anyway.
In the dialog Token created, click Copy to clipboard and store the token in a password manager. It is not shown again.
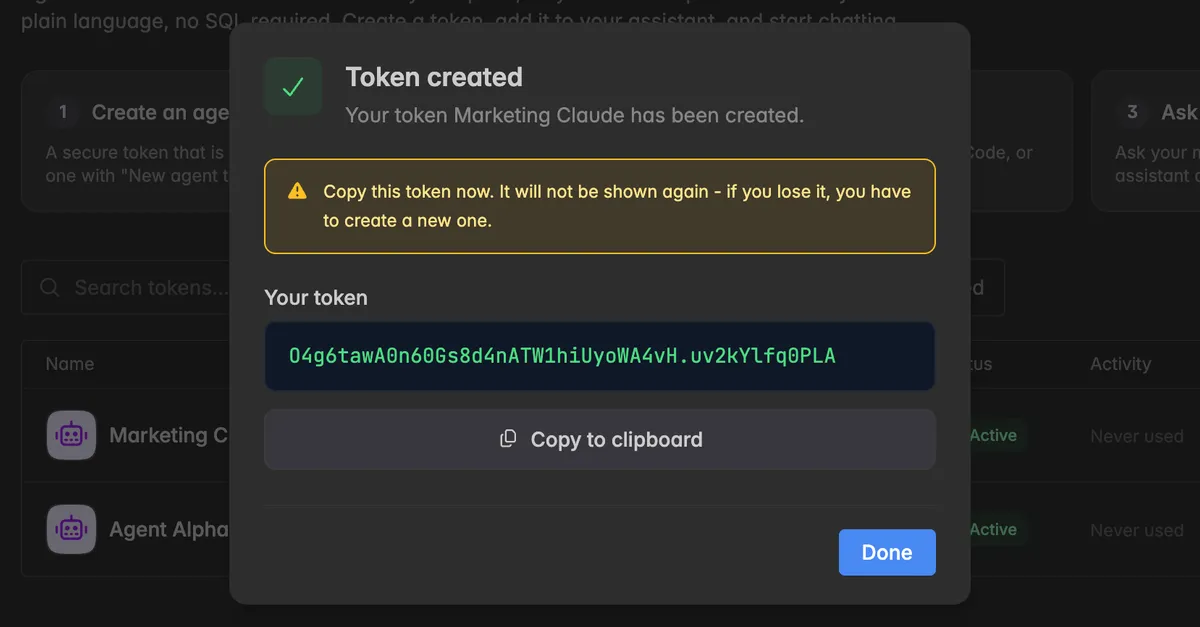
Click Done.
Never paste a token into a chat message or a shared document. It gives everything the assigned account can see.
How do I connect my AI assistant?
Below the token list, under Connect your AI assistant, pick your client. Each tab shows the steps and the configuration to paste, with a Copy button.
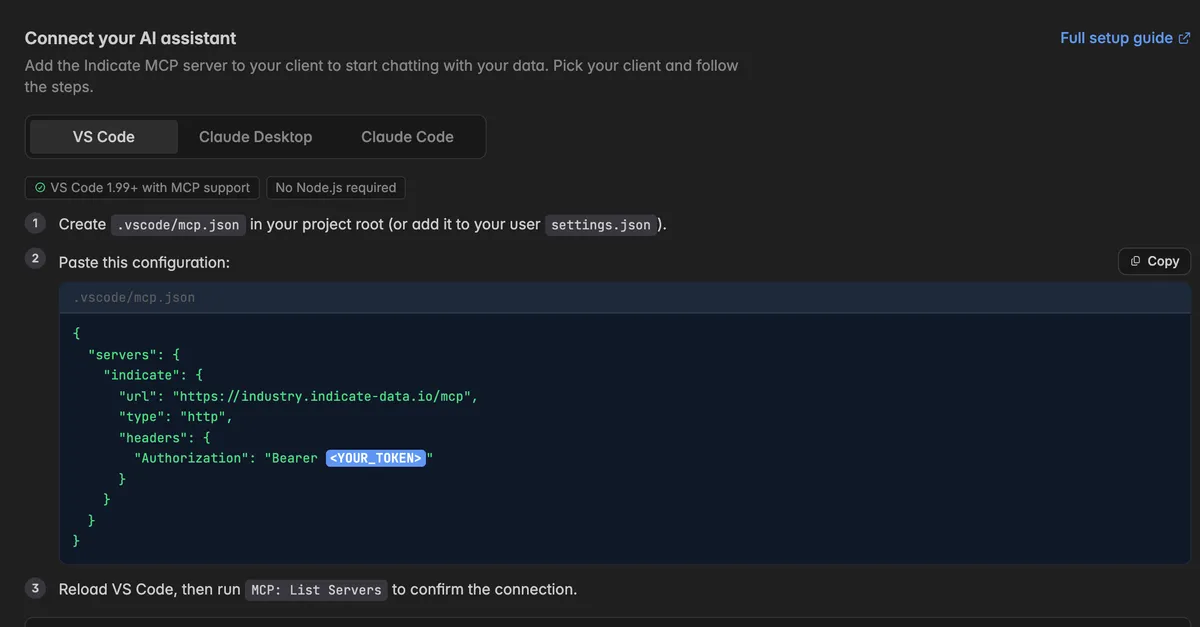
VS Code: install the Indicate extension from the marketplace, the VS Code button next to New agent token opens it. Or create
.vscode/mcp.jsonwith the shown configuration and run MCP: List Servers to confirm.Claude Desktop and Claude Code: add the Indicate MCP server with the shown configuration.
In every configuration, replace <YOUR_TOKEN> with your agent token and keep the word Bearer and the space in front of it. The server expects the full Bearer <token> value.
You can open the same configuration for one specific token: hover over the token, click ⋮, and select View mcp.json. Install in VS Code in the same menu opens the extension in the marketplace.
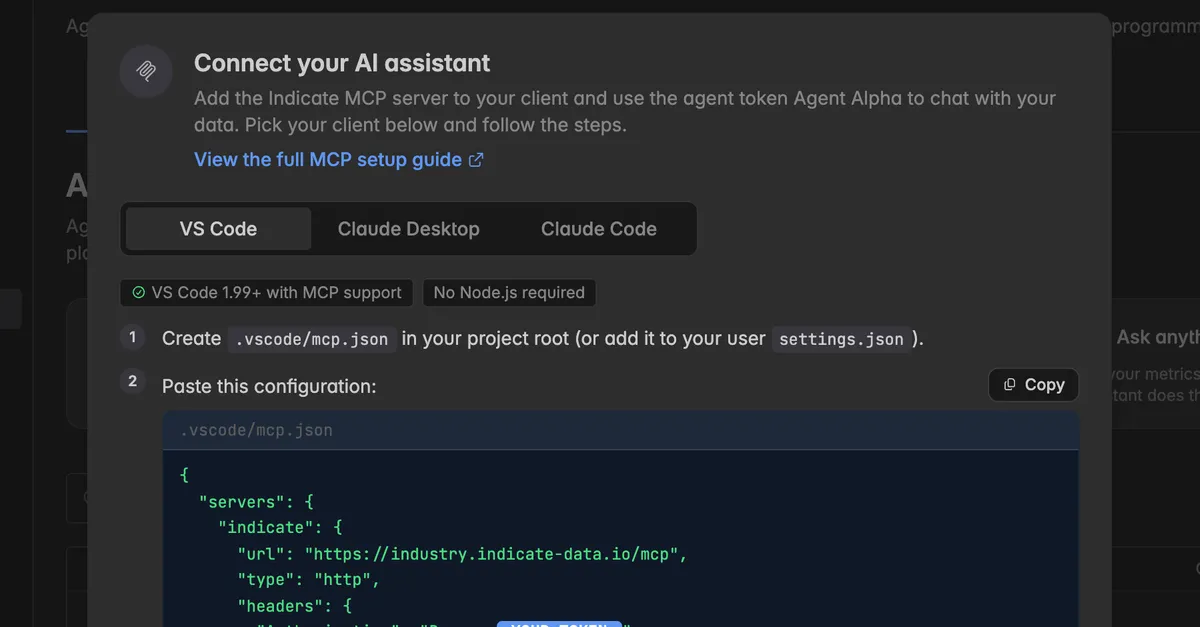
For other MCP clients, use the server URL from the configuration and the token as a Bearer header, as described in that client's documentation. Full setup guide on the page opens the detailed guide.
How do I create an API token?
API tokens need the Pro plan and the Admin role.
Open the API tokens tab and click New API token.
Enter a Token name and, under Assign to user, the member or service account the token belongs to. For a program, a service account is the better choice.
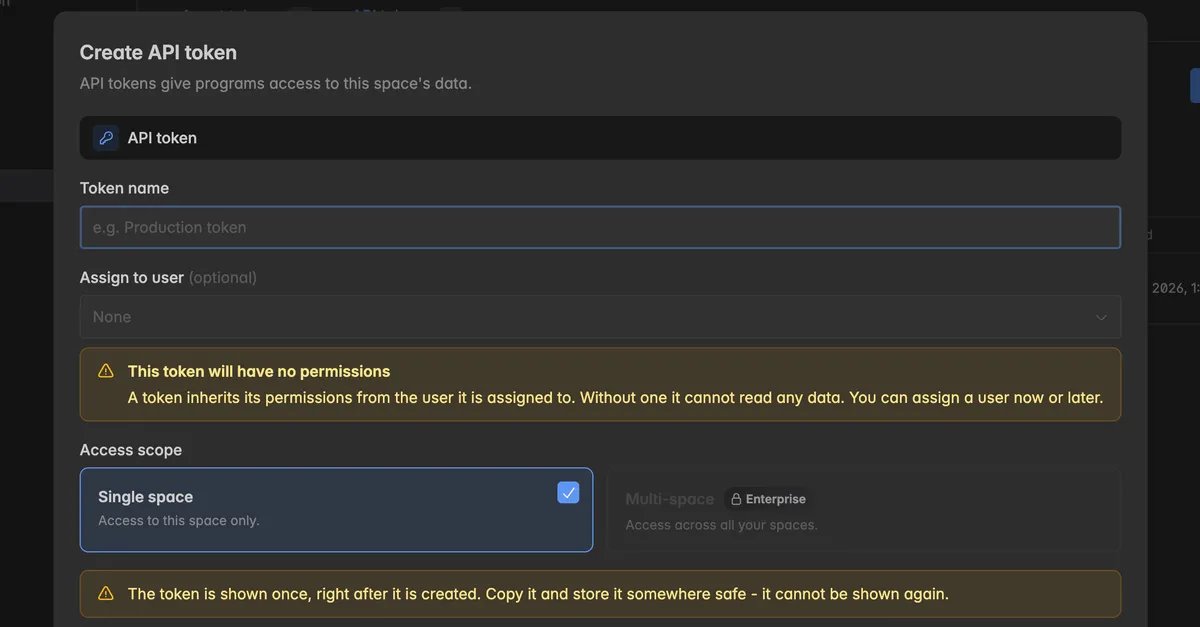
Pick the Access scope.
Click Create token, copy the token from the dialog Token created, and click Done.
There is no seat billing for API tokens.
What does the token list show?
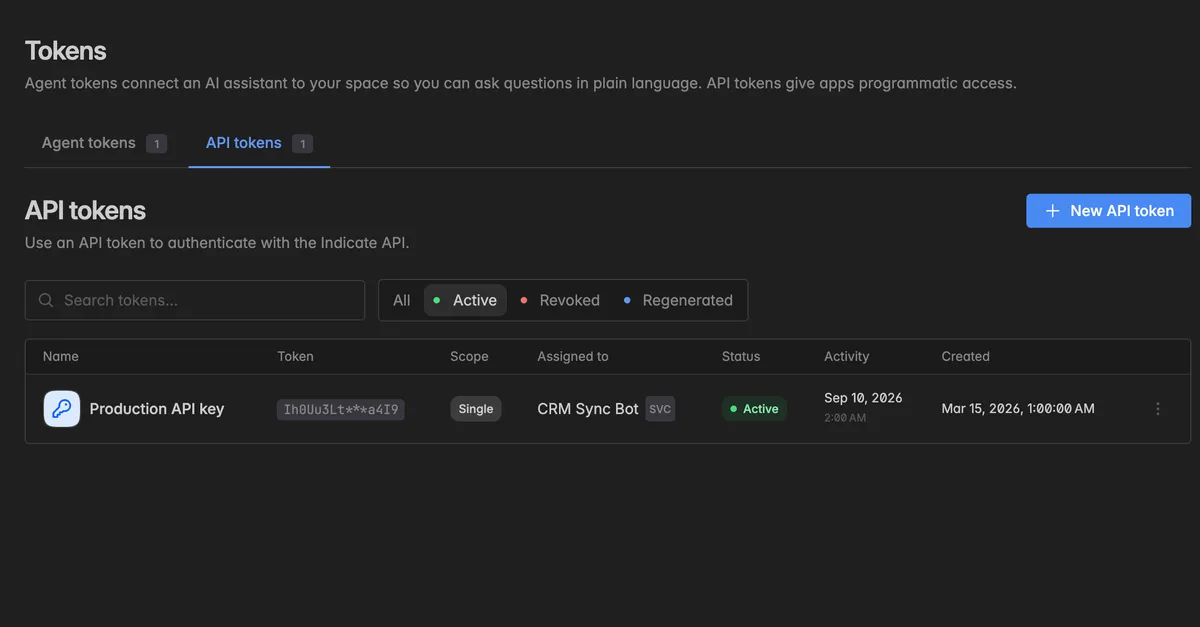
Each tab lists its tokens with:
Name and, below it, the lineage ID when a token was regenerated.
Token: the first and last characters, the rest is masked. The full value is shown once, when the token is created.
Scope: Single, Multi, or Platform.
Assigned to: the account, with the badge SVC for a service account, or Unassigned.
Status: Active, Revoked, or Regenerated.
Activity: when the token was last used, or Never used.
Created, and the date it was revoked or regenerated.
Filter by All, Active, Revoked, or Regenerated, or search by name.
How do I edit, regenerate, or revoke a token?
Hover over an active token and click the ⋮ icon at the right end of the row. Only admins see the menu.
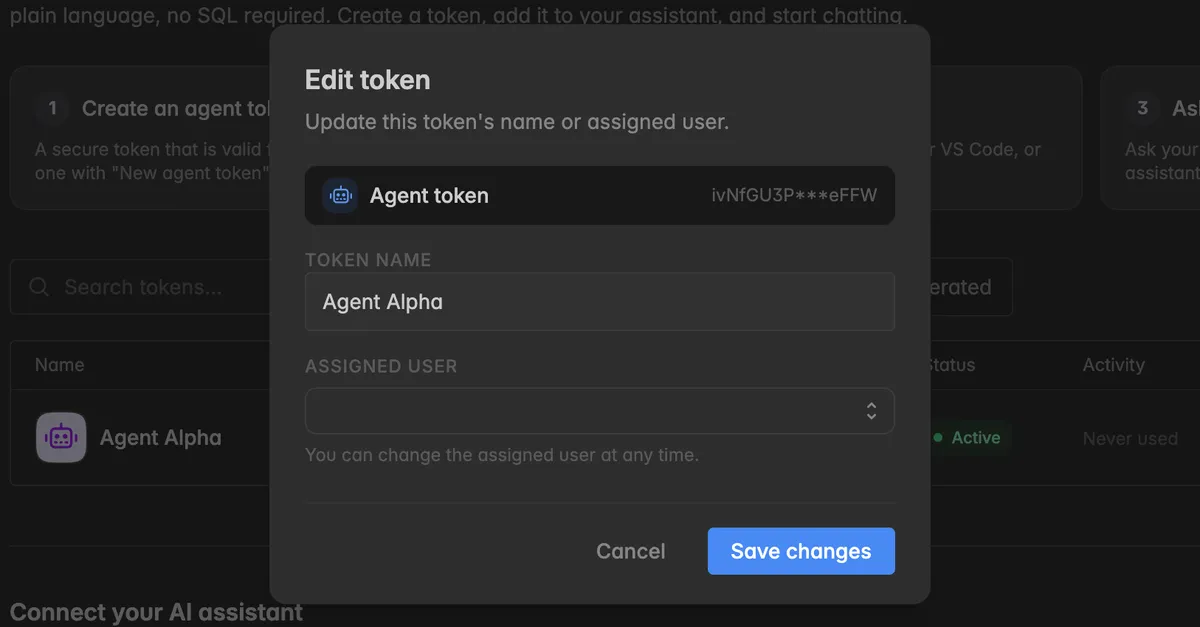
Edit: change the name or the assigned account, then click Save changes.
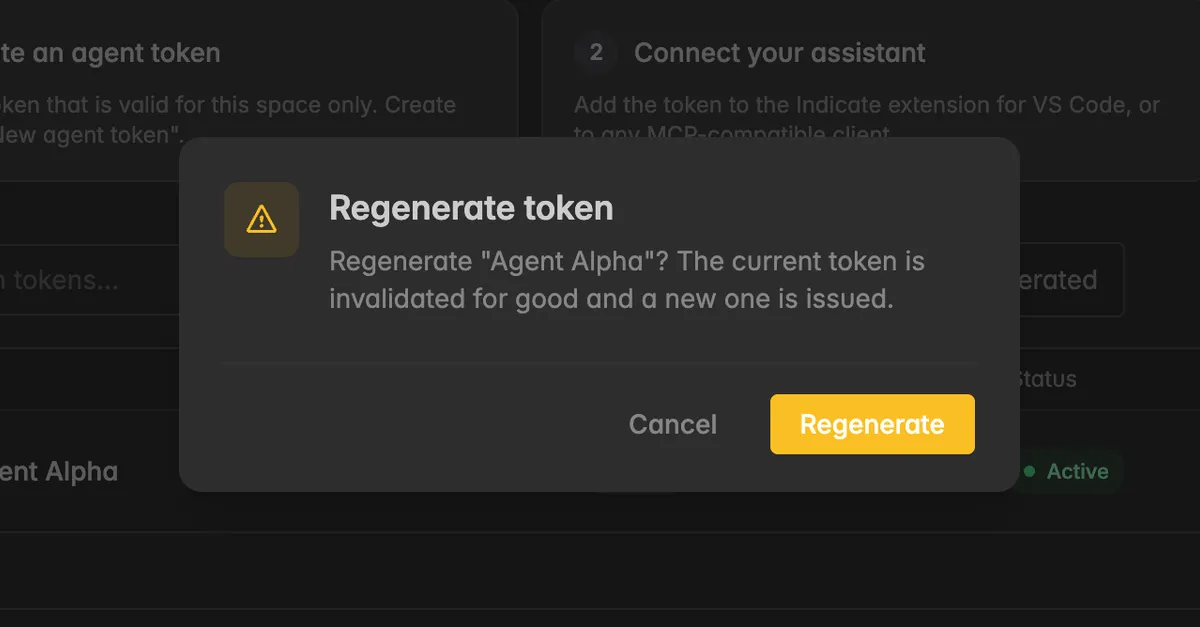
Regenerate: issue a new value for the same token. The old value stops working immediately, the new one is shown once. Use it to rotate a credential without changing the setup. The seat keeps billing without interruption.
Install in VS Code and View mcp.json: agent tokens only, see above.
Revoke: deactivate the token for good. Use it when the connection it powers should stop: a leaked credential, a departing team member, a retired integration.
To revoke:
Click
⋮→ Revoke. The dialog Revoke token lists what happens: the token is revoked for good, every call using it fails immediately, and for an agent token the seat stays charged until the end of the current billing period.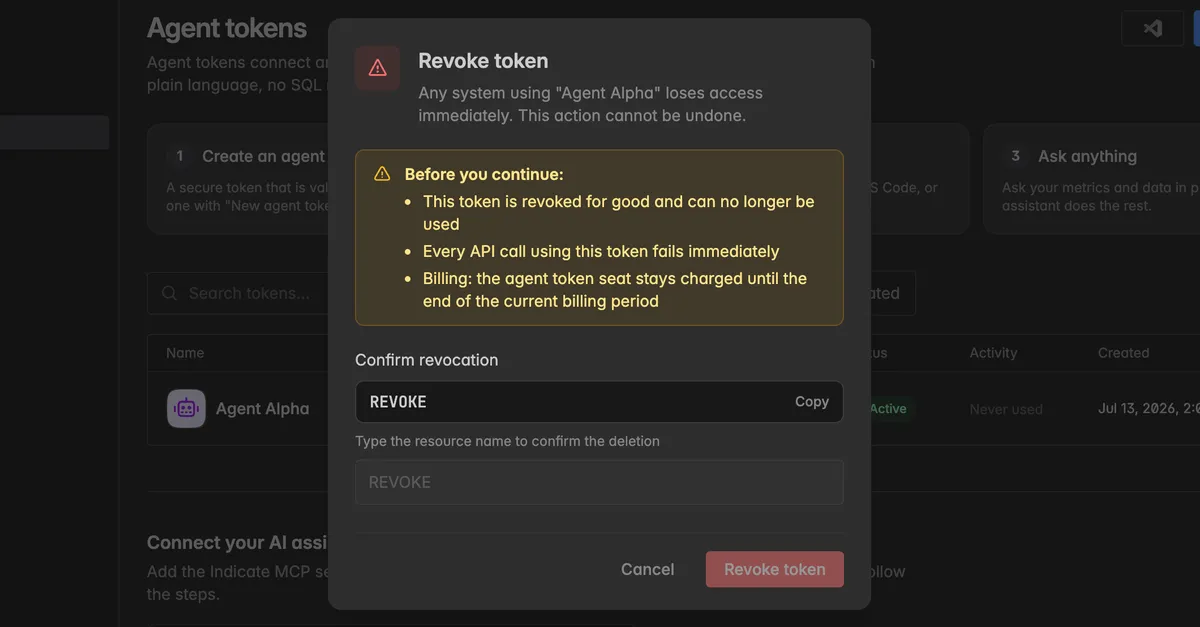
Click Copy next to Confirm revocation and paste
REVOKEinto the field.Click Revoke token.
The status changes to Revoked. A revoked token cannot be reactivated. To restore access, create a new token and update the tool.
Every creation, regeneration, and revocation is recorded in the audit log under API tokens.
Troubleshooting
My assistant says it has no access or sees no data
The token is Unassigned. Click
⋮→ Edit and assign a member or service account. The token inherits that account's role.The assigned account has the Guest role, which sees dashboards only. Give it Reader or higher.
The configuration is missing the word
Bearerbefore the token.
The assistant works in one space but not in another
- The token is Single space. Scope cannot be changed. Create a new token with Multi-space, or one single-space token per space.
I created a new space. Do I have to reconnect?
- With a Multi-space token, no. It reaches every space the assigned account belongs to, including new ones. With a single-space token, create a token in the new space.
Do I need to do anything when a new data source is connected?
- No. The assistant sees every Insight in the spaces its token reaches, including new ones.
I assigned the token to the wrong account
- Click
⋮→ Edit, pick the right account, and click Save changes. The token value stays the same.
I lost the token value
- It cannot be shown again. Click
⋮→ Regenerate, copy the new value, and update the tool.
How do I delete a token?
- Tokens are not deleted, they are revoked. Revoked tokens stay in the list for the record. Filter by Active to hide them.
The API tokens tab asks me to upgrade
- API tokens need the Pro plan. Agent tokens are available on every paid plan.
I do not see New agent token or the ⋮ icon
- Only Admins can create, edit, regenerate, and revoke tokens. The menu is also hidden on revoked and regenerated tokens.
Why split my assistant across several spaces?
- AI models have a limited context. A space with very many Insights can make the assistant overlook things. Separate spaces keep the context clean.
Was this helpful?